|
|

I'm a relative newcomer to the world of emulation, having just found out about M.A.M.E.
in February of 1999. Since then, I've become intrigued with the idea of
running the old arcade games as well as the older console games from
Genesis and Nintendo.
I
have been disappointed playing my old favorites on the computer's
hardware, however. A keyboard, mouse and Sidewinder joystick don't
substitute well for the Genesis's or SNES's own gamepad. And playing
the old arcade favorites with these controls REALLY wasn't the right
experience.
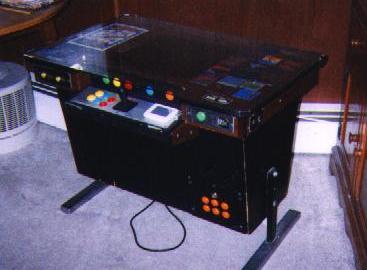
So I decided to do what others have done before and convert an old arcade cabinet into a playable M.A.M.E. machine, with the Super Nintendo and Genesis thrown in for good measure.
As
of this writing, March 26, 1999, I've been working on it for about two
weeks. This page will be a diary as well as progress report for this
project.
While
knowing that things would be a lot easier for me if I used a standard
upright cabinet (considering the greater interior space), I thought it
would easier to convince my wife to let me finish this project if I
used the more home-furnishing friendly cocktail table style cabinet.
(But honey, we can just throw a tablecloth over it when we're not using
it?).
This made things harder for me in more ways than one.
First, more people (it seems) make M.A.M.E.
machines out of standard upright cabinets, so there's a lot more
helpful information available to people starting out on that platform.
Second, it's harder to get your hands on a cocktail table cabinet in
decent shape, and I definitely didn't want to try to build one, but
after a little searching, found a one in good physical shape with a
blown monitor and a fried board for $75. It was a little more than I
wanted to pay, but measured against what it would cost me to build from
Home Depot; it was a bargain.
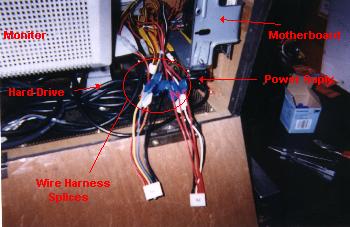
Since I was planing to replace my home computer system anyway, I relegated the old parts to "The Project". This parts used are:
I'm
bouncing around a lot with the construction of this so don't be
surprised if your reading about one phase and I suddenly am talking
about another.
Moving
to the keyboard, which will provide most of the controls I need, I
opened one of several spares I have until I found one that had
microswitches instead of those little bubble contacts like most
keyboard have. Each key has a switch soldered onto the PCB of the
keyboard with two contacts each to solder a lead wire to. The keyboard
should still work as well, so I won't have to switch keyboards when
doing "system maintenance". I'm hoping this design will prevent
"ghosting", as I'd rather not pay $80 for the Hangstrom setup. I'll
post further when I know.
I
tried to alter a trackball for use in the system, but I'm very limited
in the space I have in the control panel. The one I bought was too long
below the ball to fit in the space I had, so I tried to move the parts
around onto a new board that could be placed under the panel with out
trouble. Unfortunately, it didn't work out too well. While connecting
the leads from the new board to the old one, I pulled out some of the
printed circuit and wrecked it. I've found a trackball that will fit (a
Microsoft BallPoint Trackball, made for older notebooks in the Windows
3.0 days), but I've started thinking that maybe a touchpad will work
better. Considering that the BallPoint's ball is only about 1/2-3/4" in
diameter, it's really unsuitable for playing trackball games like
Centipede and Missile Command, and I'll mostly just need it as a mouse,
the touchpad may be the way to go.
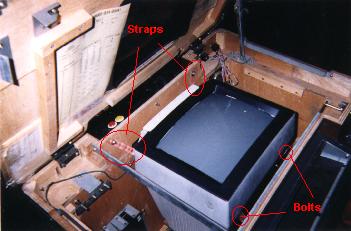
There
appear to be only two ways to place the monitor; either on a
mini-platform, or suspended from straps. I think I'll need the space
(about 3-4") under the monitor for keeping the keyboard, so I decided
to try suspending it. I opened the monitor case (Monitors have
capacitor inside that can store electricity. BE CAREFUL! I waited 5
days with the monitor unplugged and still didn't want to touch anything
inside), and drilled two holes at the top and bottom corners of the
case. I placed a 5mmX20mm bolt (with washer) through each hole. What I
plan to do is buy some aluminum or steel strapping from Home Depot,
attach the straps to the bolts and then screw the other ends to the
cabinet while holding the monitor propped up in the correct position.
When
I was satisfied that the monitor wasn't going to drop, I tried to close
the glass "hood" of the cabinet and found I had mounted the monitor a
little too high. The screen bezel under the glass top was hitting the
monitor and lifting on the glass. I had to remove the glass, lift out
the tinted plastic sheet and screen bezel and carefully grind down the
bezel until it fit snugly on top of the monitor with the glass on top.
This was pretty tedious, as I was going back and forth to the grinder,
but better that than take too much off...
I
found that the monitor swung around a little from it's short hangers,
and since I want to be able to move the cabinet around (to friend's
houses, etc.), I wanted to stop that. I put some 1/2" pipe insulation
($0.79 at Home Depot) under and over the straps between the monitor and
the cabinet, now it's nice and steady, even if you tilt the cabinet.
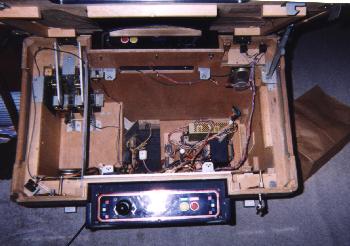
Having
the monitor in place really shows me how little space I have to deal
with in this type of cabinet. It's going to be an adventure in
sculpture getting a computer inside here as well...
I
have the system installed and secured to the cabinet; Windows 95 OSR2
was installed after putting on a spare keyboard, but for some unknown
reason, Windows failed to recognize the PCI sound card. Sigh. The BIOS
screen shows it, but the OS fails to find it. It must be me, couldn't
be Microsoft... It also failed to detect an old MediaVision ProAudio
Spectrum 16 sound card I had laying around. I'm probably just going to
pick up a 16-bit Creative Sound Blaster (see below) and give that a go. But, other than that, the system works.
My package of controls arrived from Happ, with only three blue buttons back ordered. Hopefully, they'll arrive this week.
May 1, 1999
It's
been a while since the last update to this page, most due to some
problem with Fortune City. For an unknown reason (at least, unknown to
me), Fortune City removed this page for a while. In the meantime, I
tried putting this page up on space that a friend of mine had, but that
was a pain in the rear, as I had to put my html file on a floppy, bring
it down to his place, and let him upload it, so now that Fortune City
has appeared to gotten it's act together, I'm back to being here.
In
the meantime, I've gotten a lot done with the project, and for all
intents and purposes, it's done. Of course, I've found that to be a
relative term. I should say it's done for now.
Happ
finally did get my last three buttons to me, so now I have all I need
to complete the job with at least one spare button of each color used.
Having
killed two trackballs attempting to put one on the player 1 side, I
decided to go with a touchpad mouse that was flat enough to attach to
the panel with some good double-sided tape. It works as far as I need
it to, but it's a little too sensitive with it's ability to register
taps on the pad as mouse clicks. I recently found yet another trackball
(a old Memorex, with a 2" ball and three buttons off to the right side,
so after I take a little break to chill out on this a little, I'll
re-create the player one side and try to make this trackball work in
the panel. But that's for later.
The Player Two side is laid out similarly, only with no mouse, and only four buttons.
Both
panels were made out of a piece of brushed aluminium that I cut out of
a door "kick panel" bought at Home Depot. Under each piece of aluminium
is a duplicate sheet cut out of 22 gauge sheet metal for added strength.
Above
the Player One panel, but below the glass there is a vertical area that
I have placed buttons to control (from left to right) the TAB, TILDE,
ESC, ENTER, and P (to pause MAME games) keys.
Below
the Player One panel, in what used to be the coin-box door, I've placed
six buttons in two rows to control the F3 through F7 and the F12 keys.
On
the bottom of the cabinet there is a ventilator grid that is somewhat
recessed, I put the original rocker switch for the computer on the
Player Two side near where the power cable comes out of the cabinet,
and a button wired into the DELETE key on the Player One side. Neither
button is near each other, so the delete key won't accidentally be
pressed by feeling around for the ON/OFF switch, and due to the
recessed grid, it would be very hard to hit them accidentally
After the problems noted above
with two sound cards tried in the system, I decided not to mess about
and bought a 16-bit Creative Sound Blaster for $20 at a computer show
to insure all-round compatibility. It works flawlessly in Windows95,
M.A.M.E. and ZSNES (the Super Nintendo emulator), but for some reason,
plays only very quietly in KGen (the Sega Genesis emulator). But after
the problems with the other two, I'm not complaining. I wired the
original cabinet speakers to a chopped up headphone jack. Their not
exactly high fidelity, but easier than trying to mount a pair of stereo
speakers in the case. At the suggestion of a friend, I may look out for
an old car stereo amplifier (10 amps or so, don't want to blow out
those old speakers...) and try to put that in to boost things up a bit.
I don't know if it will work, but if I can find one for $5 at a yard
sale, it's worth a try.
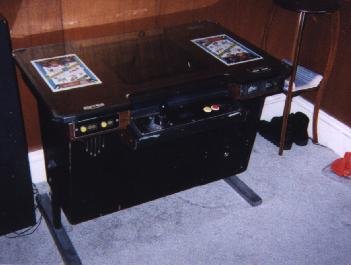
Just
for fun, I took a bunch of the screen shots of the game contained in
the cabinet and printed them out, in color on some glossy paper. I
removed on of the original Donkey Kong Jr. signs that the cabinet had
when I bought it and placed the screen shots under the glass in kind of
a montage. I think it looks pretty good, and it gives a quick look at
some of the games available on the cabinet.

I'm using a program called Keyboard Express
to assign shortcuts to the buttons to do various things. For example,
pushing the lower blue button and the Player Two button (ALT+2), runs a
macro which exits Windows95.
I
played around a little working on various things to hide the Windows 95
interface from the user when I get this project done. Made a new
Start-up Logo, Shutting Down Logo, and Safe Logo, as well as changing
the cursor to a joystick and the substituting the hourglass animated
icon with a chomping Pacman!
New Boot and Shut-Down Screens
I used ZD's LogoManager to change these screens. Download it HERE
![]()

New Wallpaper

Email To: playerone@tknq.net
|
This page has been visited
|
Other machines that were "inspired" by my M.A.M.E Project:
The Cocktail Lounge
Peter's MAME Cabinet